Refresh Div Content After Photo Upload Ajax

Uploading files from clients to servers is one of the important features of whatever PHP awarding. However, the implementation of features with proper security and hassle-gratis configuration could exist tricky. Developers could employ several PHP file upload scripts to ensure that the awarding offers this characteristic seamlessly.
- Prerequisites
- The Process of File Uploading in PHP
- Create the HTML Form
- Using jQuery & AJAX for File Upload Grade
- Configure and Connect MySQL Database With PHP
- Create a PHP Script for File Uploading
- Check if there are any errors in the upload
- Check that the file is under the set file size limit
- How to Use reCAPTCHA in PHP Contact Form?
- Wrapping Up
I volition talk over a popular strategy that developers could integrate inside their projects. In this article, I will testify yous how you tin add together PHP file upload functionality on your website using jQuery, AJAX, and MySQL.
Prerequisites
For this PHP file uploading example, I assume that yous have a PHP application installed on a web server. My setup is:
- PHP vii.1
- MySQL
- JQuery/Ajax file
To make certain that that I don't go distracted past server-level issues, I decided to host my PHP application on Cloudways managed servers because it takes care of server-level issues and has a great devstack right out of the box. Y'all tin try out Cloudways for free by signing for an account.
Get the ultimate tool list for Developers
We'll transport a download link to your inbox.
Thank you
Your Ebook is on it'southward Way to Your Inbox.
At present, that the configurations are set up, I will next work on the File Uploading Script.
Related Articles:
Multiple Images and Files Upload in Laravel with Validation
Upload Image and File in CodeIgniter
The Process of File Uploading in PHP
The process of a consummate PHP file uploading script is as follows:
- Create a Bootstrap powered HTML Upload form as the "frontend" of the script
- Ajax scripts for file upload
- Apply security checks
- Create PHP scripts to handle/process information
Create the HTML Form
The HTML course is the interface through which the user interacts and submits the information. But to make the form work with the file, <form> element must have its method set up to POST because files tin not exist sent to servers using the Go method.
Some other important attribute is enctype which should be set to multipart/form-data. Terminal but not least, the file <input> blazon attribute should be set to file.
Create a file index .php in your PHP projection and type in the following code.
<!doctype html> <html> <head lang="en"> <meta charset="utf-8"> <title>Ajax File Upload with jQuery and PHP</title> <link rel="stylesheet" href="style.css" type="text/css" /> <script type="text/javascript" src="js/jquery-i.11.3-jquery.min.js"></script> <script blazon="text/javascript" src="js/script.js"></script> <link rel="stylesheet" href="https://maxcdn.bootstrapcdn.com/bootstrap/3.three.seven/css/bootstrap.min.css" integrity="sha384-BVYiiSIFeK1dGmJRAkycuHAHRg32OmUcww7on3RYdg4Va+PmSTsz/K68vbdEjh4u" crossorigin="anonymous"> </head> <torso> <div class="container"> <div class="row"> <div class="col-md-8"> <h1><a href="#" target="_blank"><img src="logo.png" width="80px"/>Ajax File Uploading with Database MySql</a></h1> <hr> <form id="form" action="ajaxupload.php" method="post" enctype="multipart/form-information"> <div course="form-grouping"> <label for="proper noun">NAME</label> <input type="text" class="form-control" id="name" name="name" placeholder="Enter proper noun" required /> </div> <div course="course-grouping"> <label for="email">EMAIL</label> <input type="email" grade="class-control" id="email" name="email" placeholder="Enter email" required /> </div> <input id="uploadImage" type="file" accept="prototype/*" name="image" /> <div id="preview"><img src="filed.png" /></div><br> <input course="btn btn-success" type="submit" value="Upload"> </course> <div id="err"></div> <hr> <p><a href="https://world wide web.cloudways.com" target="_blank">www.Cloudways.com</a></p> </div> </div> </div></body></html>
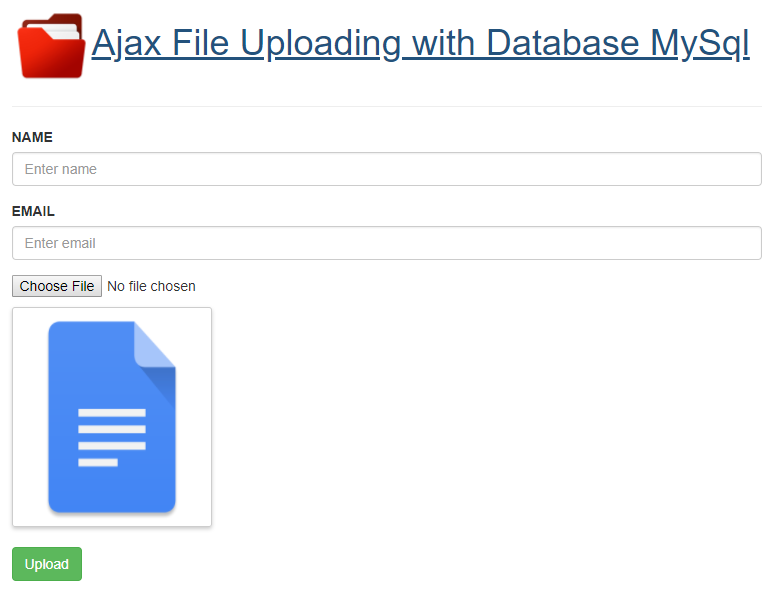
In this grade, I have used Bootstrap Classes to apply a little scrap of styling on the form. In this form, I have mentioned ajaxupload.php in the activity attribute of the course.
Stop Wasting Time on Servers
Cloudways handle server management for yous and so you lot can focus on creating bang-up apps and keeping your clients happy.
Using jQuery & AJAX for File Upload Form
Since I will apply jQuery & AJAX for submitting data and uploading the files, I will commencement past including the jQuery library first.
<script src="https://ajax.googleapis.com/ajax/libs/jquery/3.two.i/jquery.min.js"></script>
$(document).ready(role (e) { $("#grade").on('submit',(function(e) { e.preventDefault(); $.ajax({ url: "ajaxupload.php", type: "POST", data: new FormData(this), contentType: false, cache: imitation, processData:imitation, beforeSend : function() { //$("#preview").fadeOut(); $("#err").fadeOut(); }, success: function(data) { if(information=='invalid') { // invalid file format. $("#err").html("Invalid File !").fadeIn(); } else { // view uploaded file. $("#preview").html(information).fadeIn(); $("#form")[0].reset(); } }, error: office(e) { $("#err").html(eastward).fadeIn(); } }); })); }); In the above code using the $ajax() method for sending data to php also check the success data or fault in information sending.
Configure and Connect MySQL Database With PHP
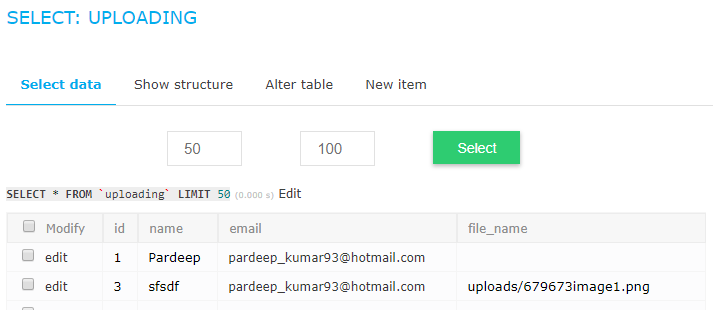
The next step is setting upwards and configuring the MySQL database. Become to the Cloudways Database Managing director and create a table named 'uploading'. The fields of this table are name, email, file_name. Alternatively, you could utilise the following SQL query:
CREATE TABLE `uploading` ( `id` int(11) Non NULL AUTO_INCREMENT, `name` varchar(100) COLLATE utf8_unicode_ci Non NULL, `electronic mail` varchar(100) COLLATE utf8_unicode_ci NOT NULL, `file_name` varchar(100) COLLATE utf8_unicode_ci Not NULL, Primary KEY (`id`) ) ENGINE=InnoDB DEFAULT CHARSET=utf8 COLLATE=utf8_unicode_ci;
Next, create db.php to connect the database with the PHP awarding. Paste the following lawmaking snippet in the file:
<?php //DB details $dbHost = 'localhost'; $dbUsername = 'fkmc'; $dbPassword = ''; $dbName = 'fkc'; //Create connection and select DB $db = new mysqli($dbHost, $dbUsername, $dbPassword, $dbName); if($db->connect_error){ die("Unable to connect database: " . $db->connect_error); } Create a PHP Script for File Uploading
When the user interacts with this class, the file is uploaded to the temporary folder and all the information virtually the file is stored in the multidimensional assortment known as $_FILES .The Cardinal Index of this array is the name aspect on this <input type=''file' name="image" > field.
In this example, $_FILES["image"] is the index proper noun.more information about the file is stored in the following indexes.
<?php $img = $_FILES["image"]["name"] stores the original filename from the client $tmp = $_FILES["prototype"]["tmp_name"] stores the proper name of the designated temporary file $errorimg = $_FILES["prototype"]["error"] stores whatever error lawmaking resulting from the transfer ?>
Once the file has been uploaded to the temporary folder and all its information saved in the array, the move_uploaded_file() function is used to move the file from its nowadays temporary location to a permanent location. The process of uploading the file is as follows:
- Check if at that place are whatsoever errors in the upload.
- Bank check if the file blazon is allowed
- Check that the file is under the set file size limit
- Check if the filename is valid (if the filename has a /, it will affect the destination path).
- Check that the file doesn't already exist at the target location (based on the proper noun).
- Finally, upload the file.
Let's create the PHP script to deal with the functionality of file uploading. Create ajaxupload .php and type the following lawmaking in it.
<?php $valid_extensions = array('jpeg', 'jpg', 'png', 'gif', 'bmp' , 'pdf' , 'doc' , 'ppt'); // valid extensions $path = 'uploads/'; // upload directory if(!empty($_POST['proper name']) || !empty($_POST['e-mail']) || $_FILES['epitome']) { $img = $_FILES['image']['proper name']; $tmp = $_FILES['image']['tmp_name']; // go uploaded file'south extension $ext = strtolower(pathinfo($img, PATHINFO_EXTENSION)); // can upload aforementioned prototype using rand function $final_image = rand(1000,1000000).$img; // check's valid format if(in_array($ext, $valid_extensions)) { $path = $path.strtolower($final_image); if(move_uploaded_file($tmp,$path)) { echo "<img src='$path' />"; $name = $_POST['name']; $electronic mail = $_POST['email']; //include database configuration file include_once 'db.php'; //insert class data in the database $insert = $db->query("INSERT uploading (name,email,file_name) VALUES ('".$name."','".$e-mail."','".$path."')"); //repeat $insert?'ok':'err'; } } else { echo 'invalid'; } } ?> Now that all the checks have been coded in, I will motion the uploaded file from the tmp folder to the upload folder. For this, starting time, create an upload folder in the project directory. This is where the uploaded pictures will be saved. Where pathinfo() is the built-in role which will return the filename and extension in separate indexes.
Cheque if there are whatever errors in the upload
To check the error in the uploaded file, blazon in the following code, If the error is greater than zero then there must be an error in the process.
if($errorimg > 0){ dice('<div course="alert alert-danger" role="alert"> An fault occurred while uploading the file </div>'); } Check that the file is under the set file size limit
The file size is measured in bytes. So, if the file size is gear up at 500kb, then the file size should be less than 500000.
if($myFile['size'] > 500000){ die('<div class="alarm warning-danger" office="alert"> File is besides large </div>'); } Where move_uploaded_file is the part which will movement the file from $myFile["tmp_name"] (temporary location) to "upload/" . $name (permanent location) also check the database table record will be inserted.
How to Use reCAPTCHA in PHP Contact Form?
Recaptcha is a free service that protects forms from spamming and abusive submission. It'southward an additional layer that works behind-the-scenes to prevent whatsoever spamming by differentiating if the end-user is a man or a bot, and requite them the claiming to solve.
To place a reCAPTCHA on your PHP website, you must utilise a simple library that wraps around a reCHAPTCHA API. Yous tin can download the "reCAPTCHA PHP Library" and then utilize the file 'recaptchalib.php'.
Add together the following code in the <form> tag where you desire your reCAPTCHA to be placed:
require_once('recaptchalib.php'); $publickey = "your_public_key"; //you got this from the signup page echo recaptcha_get_html($publickey); To check whether the users have submitted the right answers or non, a "verify.php" file needs to be created and should be set every bit an 'action' parameter in the <form> tag. Here is the code below:
<?php require_once('recaptchalib.php'); $privatekey = "your_private_key"; $resp = recaptcha_check_answer ($privatekey, $_SERVER["REMOTE_ADDR"], $_POST["recaptcha_challenge_field"], $_POST["recaptcha_response_field"]); if (!$resp->is_valid) { die ("The reCAPTCHA wasn't entered correctly. Go back and try it once again." . "(reCAPTCHA said: " . $resp->error . ")"); } else { // Your code hither to handle a successful verification } ?> Q: How to modify the maximum upload file size in PHP?
A: To upload PHP scripts, the default maximum upload size is 128 MB. However, you can ever increase its upload limit past editing the upload_max_filesize value from the php.ini file.
Q: Which the best PHP library for file uploading?
A: Though there are several files uploading PHP libraries available in the market, the best one to use is the HTML5 File Upload library. It is very easy to use and the most popular library among the developers, equally it simplifies file uploading and validation in a few quick steps.
Q: Where can I download the PHP file upload script?
A: Yous tin easily download file uploading script from phpfileuploader.com, it provides an easy to use and highly advanced file uploading script that precisely upload files to the server without refreshing the page. Using the script, yous tin easily upload multiple files and new boosted files during the upload procedure.
Q: How to movement uploaded files in PHP?
A: To motility the uploaded file to a new path/directory, yous tin use the move_uploaded_file() part to operate. It allows us to easily move the files to a new location even if they are newly uploaded. Upon successful transfer, information technology returns Truthful and if caught any exception, returns Fake.
Wrapping Up
In this tutorial, I demonstrated image and file upload in PHP using AJAX and jQuery. Here is a functional demo of the application where you could run into the app in action. In my next tutorial, I will demonstrate how you could upload and shop a file into the database using PDO .
Share your opinion in the annotate section. Annotate NOW
Share This Commodity
Customer Review at ![]()
"Cloudways hosting has one of the best customer service and hosting speed"
Sanjit C [Website Developer]
Saquib Rizwan
Saquib is a PHP Customs Expert at Cloudways - A Managed PHP Hosting Cloud Platform. He is well versed in PHP and regularly contributes to open source projects. For fun, he enjoys gaming, movies and hanging out with friends. You can email him at [email protected]
hackertiaralouse94.blogspot.com
Source: https://www.cloudways.com/blog/the-basics-of-file-upload-in-php/
0 Response to "Refresh Div Content After Photo Upload Ajax"
Post a Comment